Sales Invoices
Generate QuickBooks Sales Invoice via SCPS
Create SCPS Invoice
- Go into a project and click the Invoicing button. Select Products or Payments in the resulting dialog box.
- Create a Sales Invoice.
- Note:
- The creation of SCPS Sales Invoices is a fairly complex topic which is covered in depth elsewhere in the SCPS help documentation.
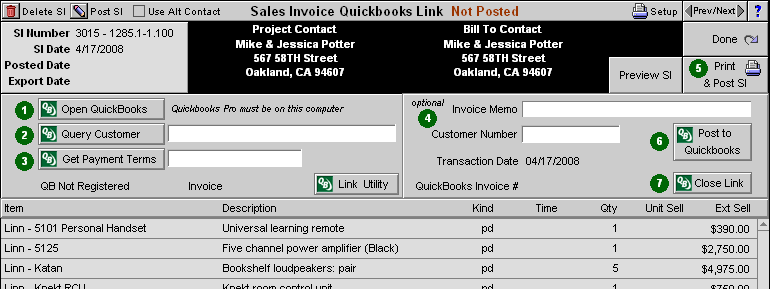
Push Invoice to QuickBooks
Follow the green numbered buttons on the screen:- "Open QuickBooks": Opens the most recently used QuickBooks company file.
- "Query Customer": Compiles a list of customers from your QuickBooks company file.
- "Get Payment Terms": Compiles a list of payment terms from those available in QuickBooks.
- "Invoice Memo": Adds a message to the "Customer Message" QuickBooks Invoice field.
- "Print & Post SI": Click this button if the Invoice is accurate and complete. If a printout is not desired, click the "Post SI" button in the upper left corner of this screen.
- "Post to QuickBooks": Attempts to push the current Invoice to QuickBooks.
- "Close Link": When a link is opened between SCPS and QuickBooks, QuickBooks sees SCPS as a QuickBooks user. We recommend the link be closed any time it's not actively being used (e.g., a user creating multiple invoices or estimates in QuickBooks in a single session).
- Attention:
- Querying customers can take a bit of time. Wait for the drop-down menu to appear before attempting to select a customer.
- Note:
- It's not necessary to select a customer. If no customer is selected, SCPS will try to match the current project's client to a customer in QuickBooks. If there is no exact match, SCPS will create a new customer record in QuickBooks with the current project's client information.
SCPS QuickBooks Invoice Screen